The Ergonomic Challenges of Working from Home

How to keep your low back, neck, and shoulders safe during quarantine, with supplies from home! An ergonomic guide.

Hello readers and welcome back to another one of my blogs!  I am taking a quick side step away from the 4 part blog series So You Think You Can Run? to discuss working from home and the ergonomic challenges that may pose.

After being on the computer so much this last week or so has made me realize the importance of a proper economic set up while working from home.  If most of you are like me I do not have the luxury of owning an ergonomic chair or having a sit stand desk to work from.  However, I do have some tips and tricks to make sure that you keep your low back safe and to prevent neck and shoulder pain from occurring.

Hello Couch, My New Home Office

I have noticed that I like to do a lot of my work from my couch.  I have these nice south facing windows that get a ton of sunlight.  I get to listen to birds chirping all day long and I enjoy seeing them travel from tree to tree in search of seeds.  I feel lucky to be right in the heart of Vancouver’s West End.

As great as the view from my couch can be, it sure doesn’t offer a lot of lumbar support when I’m working from it.  Nor do I have an appropriate height of my laptop when I’m typing.  Here is a picture of me in a very unergonomic position.

Very poor posture. My low back is rounded, my shoulders are rolled forward, and my head is tilted forward and down. This posture sustained for any duration of time can lead to all kinds of shoulder, neck and back problems.

See how my head sits forward on my shoulders?  The muscles in the back of my neck are working overtime right now to keep my heavy head upright.  My shoulders are rounding forward as well.  Both of these poor postural issues can lead to headaches, neck and shoulder pain, and numbness, tingling and poor circulation in the arms and hands.  My low back isn’t any better.  You can see how it is rounded out as well, which is greatly increasing my chances of causing a bulging or herniated disc.  Ask anyone who has had this happen to them and they will most likely say it was the most excruciating pain they have ever felt in their life.  Disc injury can lead to shooting pains in the low back and legs, numbest or tingling into the legs or gluts, as well as muscle weakness in the lower body. No fun at all.

With adequate lumbar support we can help decrease occurrence of low back pain. Adding lumbar support also helps out the rest of our posture by getting our shoulders back a bit more. But there is still one more step.

Now doesn’t this picture already look better? I started by placing a pillow into the small of my back to maintain its natural arch.  This prevents rounding of the low back and will help prevent any disc issues from occurring.  By simply using lumbar support we can see that the rest of the posture improves, however, we can still do better.
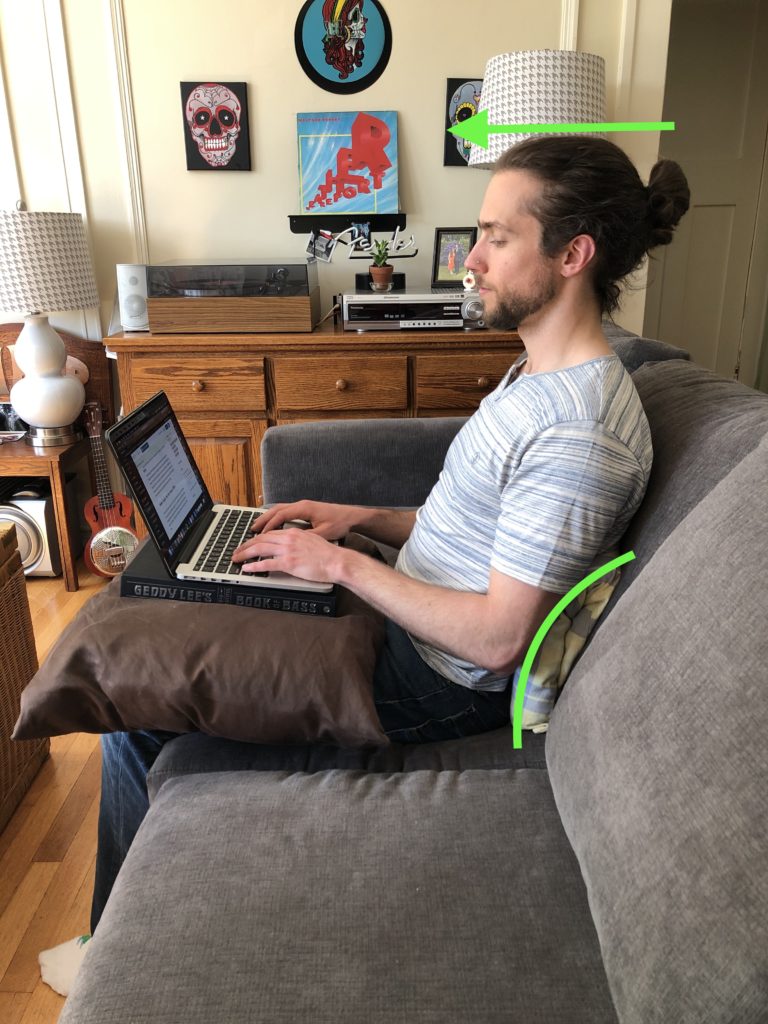
With a pillow and book on my lap to support and raise my laptop up I no longer have to tilt my head down to look at my screen. Accompanied by good lumbar support I have adopted a good ergonomic position.

Excellent!  This is a much more sustainable posture.  I have added a second pillow onto my lap as well as a book for my laptop to rest on.  Now I am no longer tilting my head so far down and forward to look at my screen. This takes a lot of pressure off of my neck and shoulders.  Having my laptop on the pillow makes it easier to tilt it back and forth so that my hands can rest ergonomically without putting pressure on my wrists or using my shoulders to hold my arms up.  Feet should be planted on the ground.  If your feet can’t touch the ground while sitting with your back all the way to the backrest try placing a book underneath them. If you feel comfortable sitting with your legs crossed, use the same principles as mentioned previously.

Apply the same principles we discussed above to any work station. Here is another picture of me working from my kitchen table. I always make sure I have adequate lumbar support and I keep my computer close enough to me so that my arms aren’t too far outstretched.

Working from the kitchen table with lumbar support. Arms are by my side, avoiding reaching too far for my keyboard. If the table height is too low you may want to put your computer on a book to raise it up to prevent your head from tilting too far forward.

*** An Ergonomic Disclaimer ***

Now that we have you all set up in a very lovely ergonomic position, I do need to add a disclaimer. Even with absolutely perfect ergonomic posture, you still need to get up every half hour or so to move around, do some exercises, or stretch (I will be doing another blog on common office stretches soon). The human body was not made to sit for long periods of time. We evolved as hunter gatherers over the course of millions of years. The personal computer has only been around for 45 years. We got some time yet before our bodies are used to this abuse. So please get up and move around, grab a glass of water, stretch, wake up those gluts, or go for a nice walk around the block (yes, even if its raining). Your body will thank you!

Well that’s it for now.  I’m sure there are going to be lots of questions regarding ergonomic work stations at home so I will try to do my best to answer them.  The most important thing to take away from this blog is making sure you have adequate lumbar (low back) support, proper computer height, and getting up often from your work space to move around.  Moving lots will help prevent pain.  And pease don’t wait to feel pain!  Be proactive and move.  Like right now.  Get up.

Best in health,

Clayton Giles, RMT
Your Wellness at Work
clayton@yourwellnessatwork.ca

So You Think You Can Run? Part 3

Gluteal activation, lateral hip stabilization exercise, and homemade gluten free bread.

Hello again and welcome to part 3 of my four part series So You Think You Can Run!  In this blog post we will be going over an activation exercise for the glut max muscles as well as the clamshells exercise for the glut med muscles.

Wake Up Those Gluts!

The first exercise we will go over today is the gluteal activation exercise.  I do this exercise before every run, as well as if I am going to be doing any heavy weight training such as squats or deadlifts.  It helps bring awareness and activation to the gluts so that you can get a much more targeted work out.  It can also help decrease low back pain associated with gluteal amnesia.

I know what you’re thinking.  What on earth is gluteal amnesia?  And what did my gluts forget?  Gluteal amnesia is when the glut muscles don’t activate or fire off properly.  For example, when coming up out of a squat, instead of the glut muscles being the main muscles activated to bring your torso up, the hamstrings and low back muscles take over the job.  This can lead to low back pain, as well as over worked and tight hamstrings.

We can get gluteal amnesia in a couple of ways.  One way can be from adopting lazy or poor lifting habits.  An example of this is bending over to pick up objects off the ground and lifting with our low backs instead of squatting down and using our legs and gluts to lift. 

Another thing that can lead to gluteal amnesia is sitting.  Sitting is awful for us, that is why it is recommenced to get up from your desk or work space to move every 30 minutes to prevent health risks associated with it.  One of those risks is developing gluteal amnesia.  Sitting on our gluts for long periods of time creates a compressive force which is not good for both circulation and nerve function.  This can cause the glut muscles to become inactive or weak, and results in the recruitment of surrounding muscles (low back muscles and hamstrings). Tight hip flexors can also contribute to gluteal amnesia.

Gluteal Activation Exercise

We can help fix this issue by bringing awareness to our glut muscles.  Start by lying facedown on the floor and relax your body.  Let’s start with the right glut.  Place your right hand on your right glut. 

Start/rest position for glut activation exercise right glut. Contract your gluts and feel for the muscle activation before any movement in the leg.

Activate your glut by squeezing your gluts together.  Once you feel that glut contraction with your right hand, you can slowly raise your right leg and thigh behind you off of the ground.  You don’t need to go too high when extending the leg, just a couple of inches.  You’ll want to avoid excessive arching of your low back.  If you feel low back pain you may be lifting your leg too high off of the floor.  After holding the leg up for 2 seconds slowly bring the leg back down and relax your muscles again.  To initiate the next rep contract your gluts, then lift your leg.  It’s very important you contract your glut first before lifting your leg, so go slowly and take your time with this.

Contraction of gluteal muscles followed by a slight lifting of the leg. Make sure you contract your gluts first before any other movement. This is very important in retraining your glut muscles. After bringing the leg down let your muscles relax completely before contracting the gluts again for the next rep.

FIDs for this exercise are 3 sets of 10 reps.  Once you do 10 on the right side, do 10 on the left.  Take your time doing this exercise, and if you feel any major pains or discomfort while doing it please discontinue.

Clam Shells Exercise

The next and final exercise I will go over are clamshells.  This is a very important muscle when it comes to running (I’m sure I’ve said that about all of them though).  Weakness in these muscles can lead to low back pain, knee pain, hip pain, and poor hip alignment.  A lot of exercises that we do involve the anterior/posterior chain (forward and backwards movements).  These include things like squats, lunges, running, swimming, and biking.  Not very often do we take time to train the lateral chain, which is unfortunate because they add stability and strength to the previously mentioned activities.

To do this exercise lie down on your left side.  Bend your left arm and place your left hand under your head to give your neck and head support.  Bend both of your knees and keep them and your feet stacked on top of one another.  With your right hand, place your right thumb on your right anterior superior iliac spine (the pointy bony thing in the front of your hip).  Place your fingers on the muscles on the side of your hip.  This is where your glut med muscle sits, and it is the muscle you will be feeling for when it is activated.  Now that we are in position make sure you don’t roll back and forth while you do this exercise.  Think about keeping your hips perpendicular with the floor.  All the movement should come from the hips.

Clam shells exercise start/rest position. Thumb is on the bony spot on my hip and my fingers are resting on my glut med muscle.

To initiate the exercise keep your feet on top of one another, but open your legs by parting your knees.  You should feel your glut med muscle firing off underneath your finger tips as you open up your legs (like a clam).  Slowly open your legs, then slowly close them.

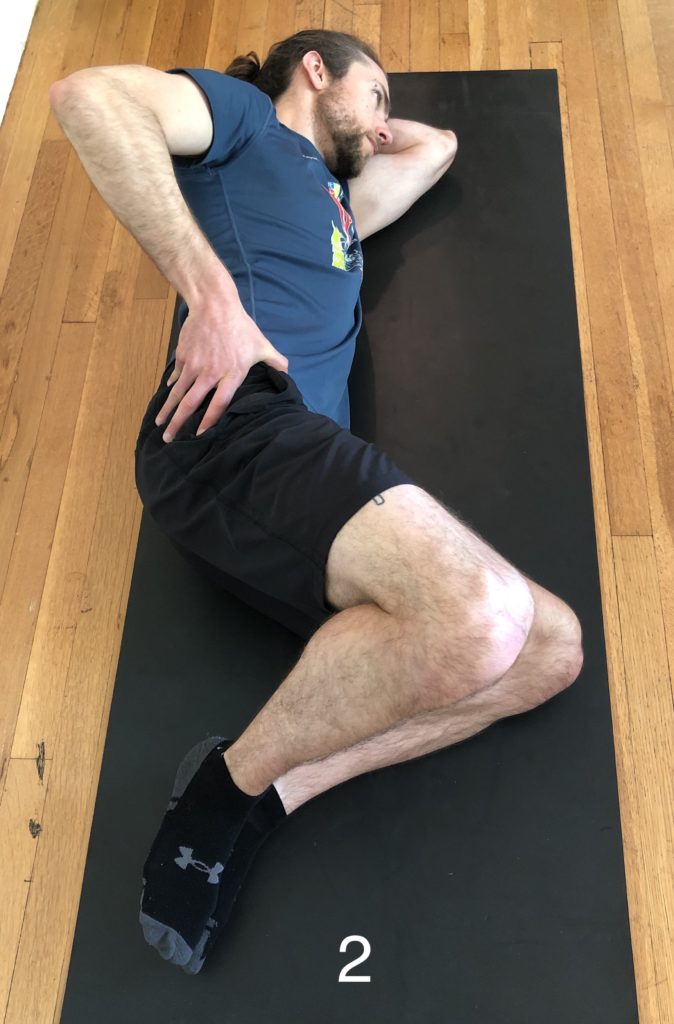
Clam shells exercise activated. Do not roll back through the low back, let all the movement come from the hips. Slow and steady while doing this exercise is important.

Remember to keep your hips perpendicular with the floor, no rocking back and forth.  It might not feel like a big range of motion, and that’s okay!  There are differences in hip anatomy which can be due to gender or ethnicity.  So if you don’t have as much range of motion in your clamshell as someone else it just might be your genetic make up.  Unless of course there is pain or a major difference in range of motion between your left and right sides then please seek medical help or consultation.

FIDs are the same as the glut activation exercise, 3 sets of 10 reps.  Once you do 10 on the right side, do 10 on the left.  It is very important just like the glut activation exercise to SLOW DOWN and take your time with this exercise.  Focus on the muscle being activated and doing it properly.  As with all the mentioned exercises please discontinue doing the exercise if it creates abnormal pain or discomfort.

And now for something fun to do…

Before I let you go for todays blog I want to share with you my latest quarantine kitchen creation, and that’s my gluten free artisan bread!

I never thought I would ever bake my own bread, but I guess these are unprecedented times (I could go the rest of my life never hearing that term again and die happy).

I am super impressed with how this bread recipe turned out.  I had brewed my own ginger beer last week and that didn’t quite turn out like I had hoped, but I was very pleased when I was able to use some of it for this recipe (if anyone knows of a good ginger beer recipe please send it my way).  I just used a generic gluten free flour from the store.  As for toppings I used sesame seeds, caraway seeds, onion salt, and pink Himalayan raspberry and rosemary flavoured salt.  Yes it was delicious!

My freshly baked gluten free bread!

A disclaimer with the recipes, I am not a nutritionist!  These recipes are intended for fun and for something to do during our COVID-19 isolations.

That’s it for today’s blog! Thank you again for reading.  Part 4 of the So You Think You Can Run Series will be putting the what we talked about all together.  If you have any questions please email me at clayton@yourwellnessatwork.ca.  Thank you very much and have a great day!

Best in health,

Clayton Giles, RMT
Your Wellness at Work

So You Think You Can Run? Part 2

Side plank, the run/walk, Buddha Bowls and pickled ginger.

Hello again and welcome back to part 2 of So You Think You Can Run? This running exercise series is focused on preventing some of the most common running injuries.  Today we will be focused on the side plank.  But before we get into that, there is something important about running that I would like to discuss that will be essential to injury prevention.  That is the 10 minute walk warm up as well as the run/walk method.

Always Walk to Warm Up!

After doing the exercises described in this blog series, the next thing that you should do right when you get outside the door is to start with a 10 minute brisk walk to warm up.  Do not skip this step!  This is probably just as important as all of the exercises we will be going over.  Your 10 minute brisk walk before your run is a fantastic way to warm up your muscles and ligaments, as well as to lubricate the joints in your arms, legs and spine.  It is also a great way to help prevent any disc injuries from occurring. Just like if you were to go skiing for the first time of the season, you wouldn’t immediately go for a black diamond run, you would most likely start with a green or blue run to warm yourself up and get back into your rhythm.  Warm ups are key!

The Run/Walk Method

Once your 10 minute walk warmup is complete, you can start running.  But if you are a beginner runner, or an intermediate runner like myself that is getting back into it more heavily, you’ll want to do the run/walk method.  For myself, I started out this pandemic by doing a 2 and 1.  This means 2 minutes of running, followed by 1 minute of walking (you’ll want a watch or phone to keep time).

The idea is to have the right ratio of running to walking to prevent any pain or injuries from occurring.  Tailor the ratio to your specific needs.  You might need to start with a 30 second run, followed by a 2 minute walk.  That’s okay!  Each time you get out to run you will get stronger and better at it.  What we want to avoid is injury at all cost.  We don’t want to take one step forward only to take two back.  Be kind to yourself at the beginning and start slow and gradual.  As your body becomes stronger and the muscles adapt to your new exercise then you can start to push yourself and set more intense goals.  Start small, and I am sure you’ll surprise yourself with how quickly you can progress.  Also, by doing the run/walk method it will enable you to do the activity for much longer than just trying to run the whole time.

With the 10 minute walk warm up and the run/walk method explained, we will turn our attention back to todays subject of the side plank.  This exercise is important for lateral stabilization of the core muscle group.  Without lateral stabilization we run the risk (Ha! Run the risk.  No pun intended) of creating low back pain and knee pain.

How to Side Plank

To start this exercise lie on your right side, legs extended, with your left foot in front of your right.  Prop yourself up with your right arm underneath you with your elbow directly underneath your shoulder joint.  Your forearm will be flat on the ground pointing in the same direction you are looking.

Rest position of the side plank.

To initiate the side plank push your hips up and forward.  Don’t bring your hips up too high, think about keeping your spine straight (as mentioned in the previous blog doing this in front of a mirror would be very helpful).  Keep your right shoulder engaged by pushing it down into the floor.  Push the outside of your right foot into the floor as well to help engage the gluts and lateral stabilizers of the leg.  Keep in mind the position if your head as well, it should be in line with the rest of the spine.  Once you have fatigued your right side, turn over and start again on your left.

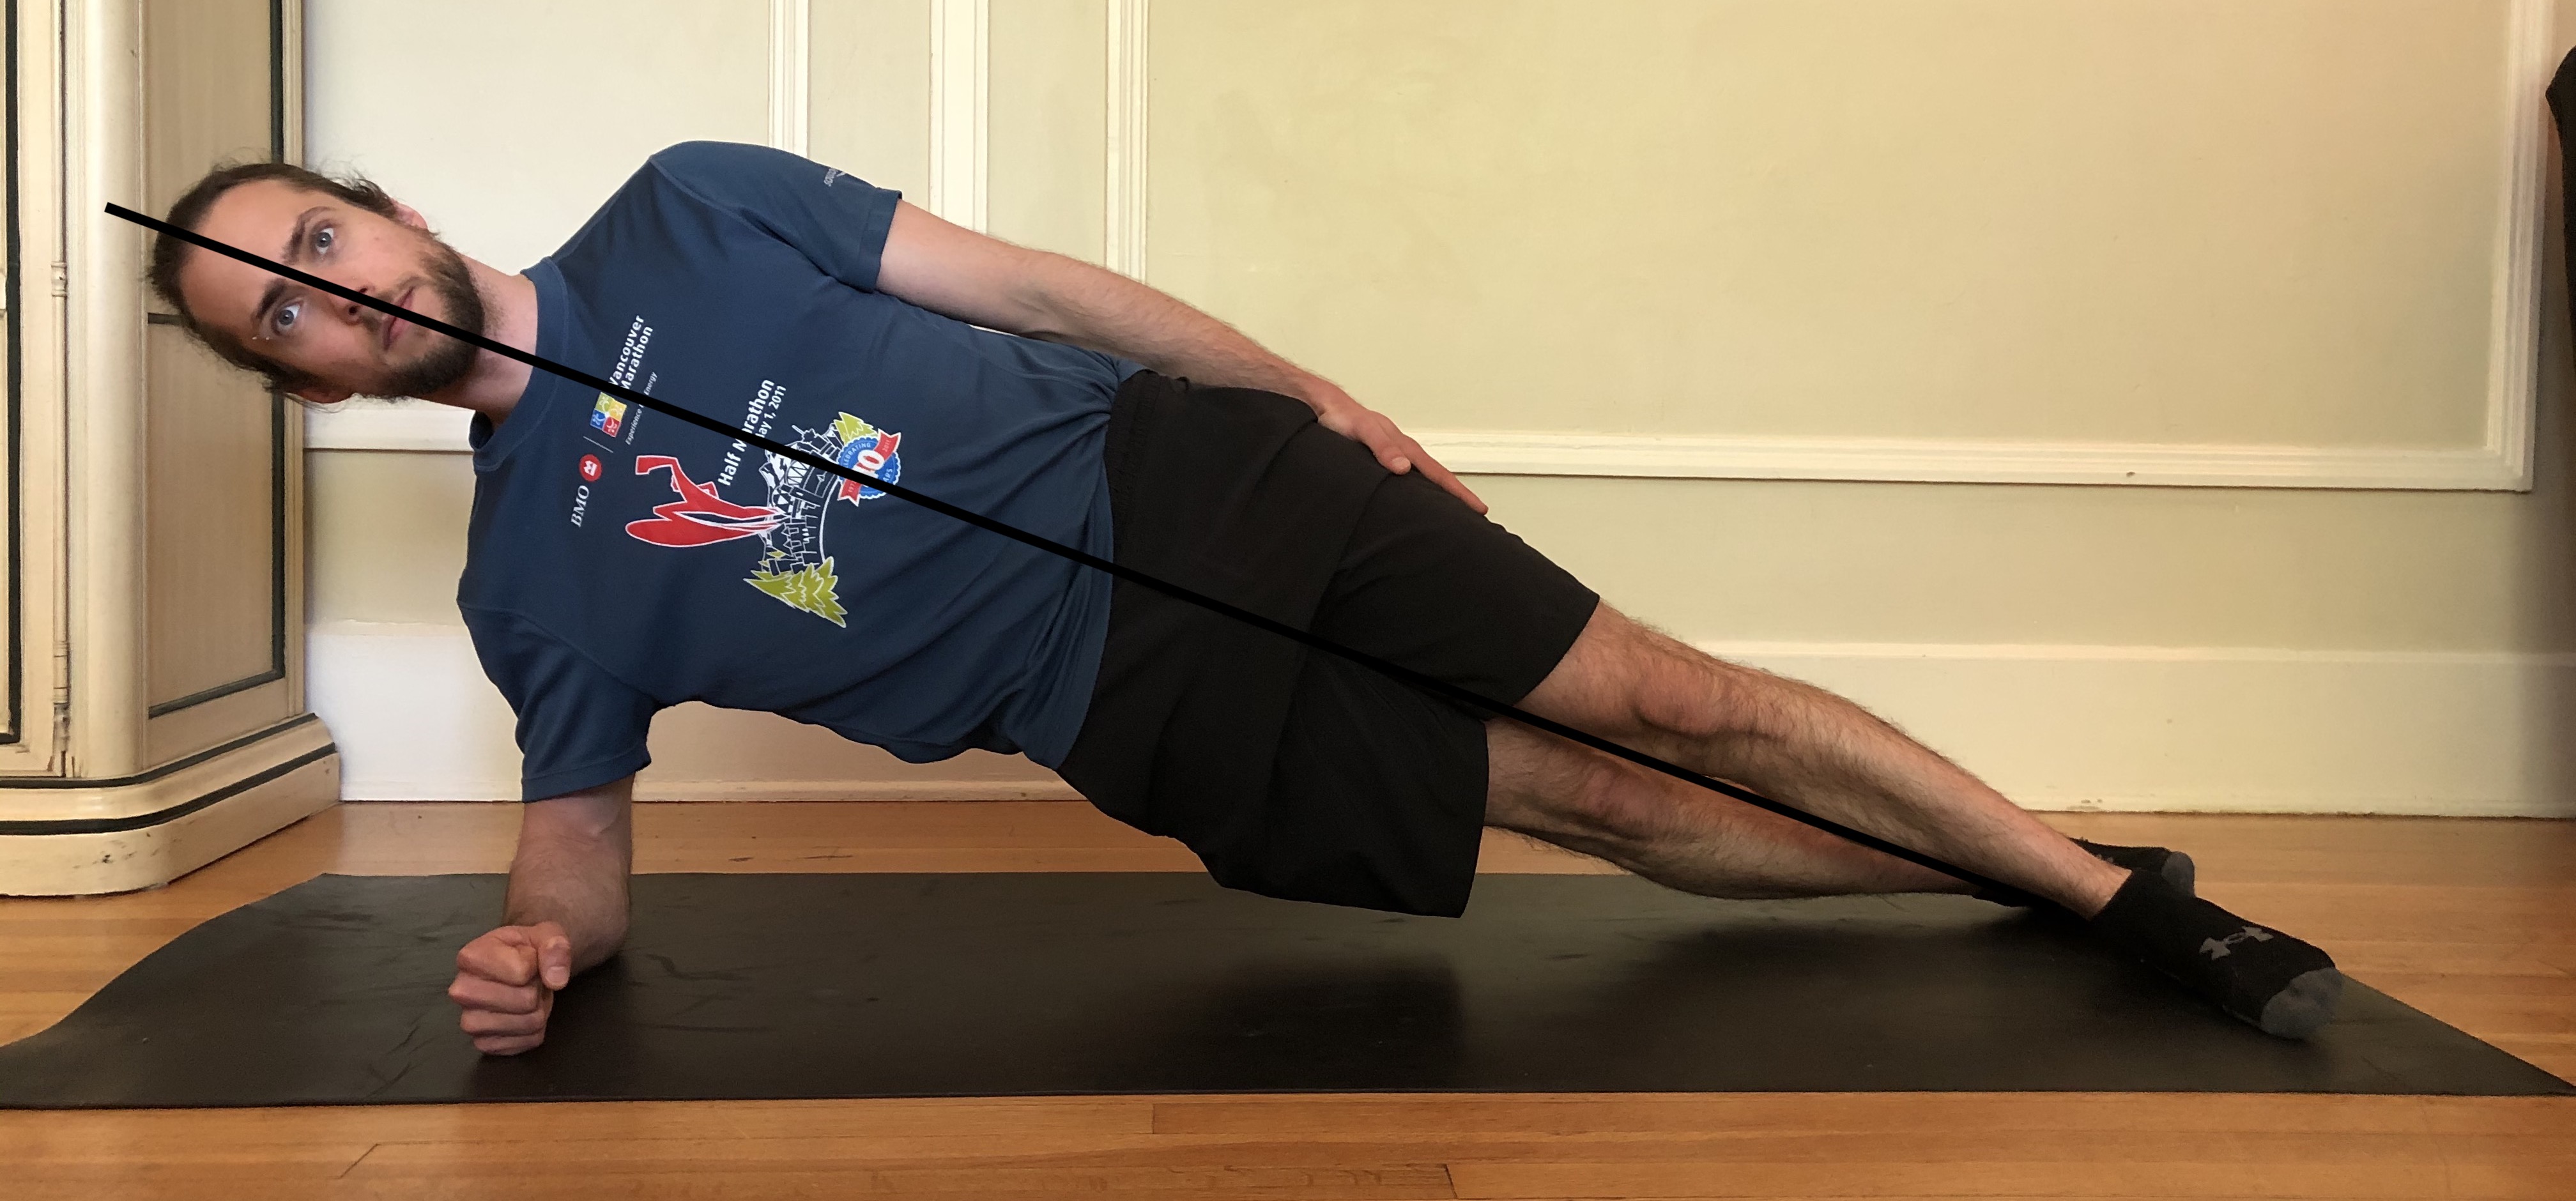
The side plank. I have added a line to show form.
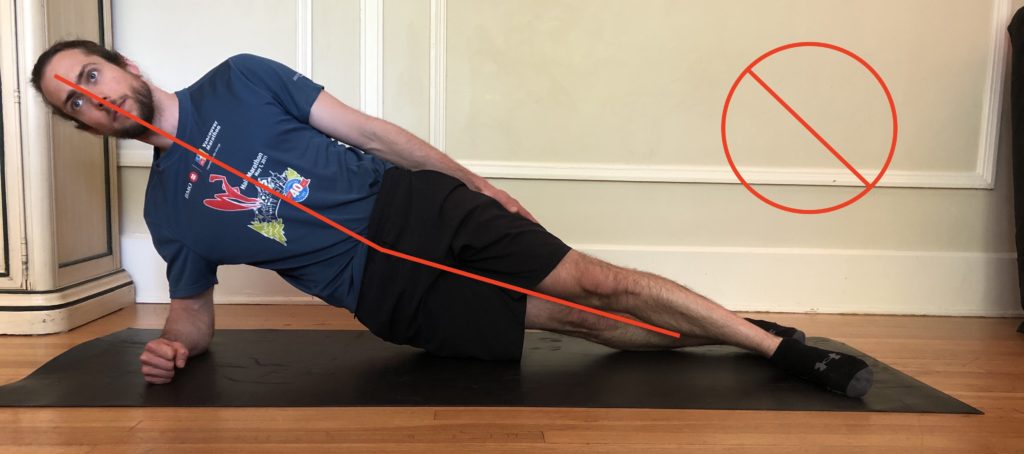
Side plank improper form. See how the hips are too high and the spine is now arching to compensate? Improper form like this can lead to injury.
Now the opposite of having the hips too high. This improper form of the side plank has the hips too low, curving the spine again. This can also lead to injury.

If you find the full side plank too difficult or hard on the shoulders, you can try side plank from your knees.  Instead of lying on your side with you legs extended, start with your legs bent at the knee at about a 90 degree angle.  Pop up into the side plank just like mentioned above, but this time you’ll be putting pressure through the side of your right knee instead of your foot.

Side plank from the knees resting position.
Side plank from the knees. If you feel like the full side plank is too difficult or too hard on the shoulder try this position instead.

I would recommend the same FIDs as previously mentioned with the plank in part 1 of this blog series.  I do 20 seconds of side plank, followed by 10 seconds of rest, until my form starts to deteriorate or until I start to shake.  But once again tailor it to your strengths and needs.  If you can only do 5 seconds of activation and 10 seconds rest that is okay.  We want you to build strength slowly and safely and prevent injury from occurring.  Above all else perfect your form.

Something fun to try in the kitchen!

Well, before I let you go I just want to pass on a couple recipes that I have tried out recently due to the COVID-19 social isolation situation.  Also I should include this as a disclaimer, I am not a nutritionist!  As a Registered Massage Therapist it is not within my scope of practice to give out nutritional advice.  These recipes below are intended for fun and for something new to try.

Now that that’s out of the way, this Kale and Quinoa Salad Bowl with Curry Coconut Dressing is amazing.  My girlfriend and I have had this quite frequently for our lunches.  I do make some changes to the recipe though on behalf of my girlfriend’s allergies.  We substitute coconut milk for almond milk, peanut butter with almond butter, soy sauce for gluten free soy sauce, and peanuts with cashews or walnuts.  Still tastes amazing.

I was also trying to find ways to change up the bowls by adding fruits such as pomegranate or mango, and even making homemade Crispy Falafels.  But the one thing I have enjoyed the most is pickling ginger.  Here is a video with a great tutorial on how to pickle your own home made ginger!

The hardest part is waiting the week before you get to eat them!  I have pickled some red onions but I wasn’t too happy with the outcome.  If I find a good recipe for that I will let you know.  I will also be trying my hand at pickling shredded carrots soon.

Well that feels like enough writing for now.  If you have any questions in regards to the side plank, or the run/walk method please feel free to email me at clayton@yourwellnessatwork.ca.

Thank you again for reading and have a safe quarantine!

Best in health,

Clayton Giles, RMT
Your Wellness at Work

So You Think You Can Run? Part 1

A quick hello and an introduction to the plank.

Hello and welcome to my blog series So You Think You Can Run! I hope you are all staying safe and healthy during these interesting times as we continue to flatten the curve against COVID-19.  The more we follow the recommendations set out by health officials the sooner we all get back to our regular lives.

Before I get into our topic today I would like to thank all the front line workers out there that are risking their health and well being to provide the goods and services that are essential to our society.  Everything ranging from grocery store clerks to freight delivery drivers to nurses and doctors, we need to show these people our support by thanking them whenever possible.  Make them feel appreciated for the risks they are taking so that we are all able to get through this together.

I’d also like to address my absence from doing anything clinic related up to this point.  When the pandemic began to accelerate in severity and all non-essential health care clinics were shut down, I offered my time and help to the grocery store down the street.  I would get up at the crack of dawn to start at the store before it opened to sanitize all commonly touched places including grocery baskets and carts.  From 7am until 8am was seniors hour, so I was able to help anyone out who needed it with loading groceries or finding specific items.   I enjoyed that part the most.  However, now that the panic buying is over and things have settled down a bit I now have the time to return my attention to taking care of my patients.  I am going to miss the grocery store.  I started to get to know a lot of people from the community and there sure are some characters down in the West End!

Exercises to do Before Your Run

So on to our topic.  Since the weather has been absolutely fantastic (we are so lucky to be living in Vancouver) and we are all doing our part by isolating and staying in our own neighbourhoods, I am beginning to see a lot more people getting out to run.  This blog topic will be written in 4 parts and will focus on 4 exercises any runner should do before they get out for their run. These exercises will help to prevent some of the most common running injuries.  This is important due to the closure of massage and physiotherapy clinics, so getting the help you may need will be quite difficult.  Prevention is the best medicine!

Before you start running you’ll want to make sure your core muscle group is activated.  If your core isn’t activated or warmed up before a run it could lead to low back pain or even knee pain.  So the first exercise I will go over is the plank.

How to Plank!

To begin start by lying on your stomach and place your forearms flat on the ground in front of you about shoulder width apart, with your elbows right below your shoulders (think 90 degree angles).  Your toes should be planted as well.

Plank in the resting position.

To initiate the plank bring your hips up so that they are the same level as your shoulders (if you have a mirror in the house this is extremely helpful to correct your form).  To avoid your shoulders from dipping, push down towards the ground with your arms to keep your upper back and chest muscles activated.  Keep your head and neck in line with the rest of your spine, don’t look up or down.  And lastly to keep your low back from arching too much, contract your glut muscles.  This last tip is usually forgotten but I find it to be one of the most important.  If you have done planks in the past and you felt like they hurt your low back, this might be part of the problem.

The plank position. I have drawn a line showing proper alignment. Note how the shoulders are the same height as the gluts. There is no dipping between the shoulder blades, and no over arching of the low back.

Now for the FIDs (frequency, intensity and duration), which is clinic talk for how long do I hold it and for how many reps?  This particular exercise I’ve seen done to extremes far too often.  I have seen people holding the plank position for up to 2-3 minutes, and near the end of it their form looks just awful.  Dipping shoulders, arching low backs, shaking all over like a jelly fish… I don’t like it.  Holding the plank for that long is not practical.  When in your day to day life are you doing to need to contract 100% of your core for 2 minutes straight?  Unless you’re a MMA fighter or some other extreme pro athlete, you won’t.  What I do and what I advise my patients to do is to approach the plank like any other gym exercise; activity followed by brief rest.

For example, once you get into the plank position, hold it for 20 seconds.  Once 20 seconds has passed, rest on your stomach for 10 seconds, then repeat.  Continue this process until you start to feel shaky or your form starts to break.  Since this is a warm up to your run you won’t want to push yourself too hard because you want to activate your core, not fatigue it completely.  And if 20 seconds feels too long then do a 10 second hold followed by a 10 second rest.  It’s important to focus on form, which will in turn help us to prevent injuries from occurring.  If you feel any major pains or discomfort while doing this exercise please discontinue.

Well I think that’s enough for my first blog post, I don’t want to over do it with too much writing.  Next time we connect I will talk about the side plank, and the following one will focus on glut activation.  Part 4 of this series will focus on putting it all together in a routine.  I’ll also be including some of the activities/hobbies I’ve been up to as of late to give you all some ideas or inspiration if you are starting to go stir crazy at home.

Thank you so much for reading.  If you have any questions or concerns in regards to what we discussed above please feel free to email me at clayton@yourwellnessatwork.ca.

Best in health,

Clayton Giles, RMT
Your Wellness at Work